
When we first moved to Google Workspaces (Gsuite at the time) from our Exchange Server one of the basic necessities that we needed was the ability to set a company wide template for Gmail users. We found work arounds like using GAM and Windows PowerShell to set each users signature, it worked but it felt old fashioned and duct taped in. We have decided to move away from the need to have a server or machine to house this script form Windows Active Directory. Also it never felt right with me that there was a tool like GAM sitting on a machine that had full domain access. We didn’t trust having that kind of entry point to our entire organization data just sitting on a windows machine just to set a Gmail signature.
We later moved to a Google Workspace reseller called Promevo that had a product call gPanel that is just like the Google Admin site but 100x better and constantly getting new features. It had lots of features and bells and whistles that Google could provide but has not programmed into their GUI. They also had a tool for applying signatures across the domain and we have been using this tool for the last few years for our signature needs. Circumstances have caused us to have to find a new reseller that is in Canada not the US so that we can get proper licensing for Google Voice. When doing the planning on how this change will affect us, one of issues that came up from leaving Promevo was the loss of using their signature tool. I have been getting better at my Google App Script capabilities so I decided to see if there was a way to do this with my new found skills. After searching the web for how to do this assuming lots of other people must have done this before. What I found were partial examples in different programming languages. The API documentation helps a bit but it did not help with any useful examples. I found lots of examples how to set your own signature using the GAS built in GmailApp Class. So AGAIN I am forced to do it myself and make a blog because there are no examples on the internet on how to do this. Please note this is not just a simple copy the code and run it. It requires that you have full admin access to your Org in Google Workspace and the ability to create new Google Cloud Projects. I will try to explain each step in as much detail as possible. So enough jibber jabber, here is the solution I came up with.
Custom Attributes
I decided to not use a Google Sheet to store all the settings as to who gets a signature and the values to place in the signature template. I wanted to integrate this so when setting up a new user we could use a single piece of glass (Google Admin) to manage these settings so when creating a new users you don’t have to go to 3 different places every time or remember to clean up after a user leaves.
In my last script I learned about creating Custom Attributes for user profiles so I decided to try an implement this into the signature script. Based on our needs I decided to create the following custom attributes:
To setup Custom Attributes go to “Google Admin > Users > More > Manage Custom Attributes > Add Custom Attribute” or click the link . I created my Custom Attribute as follows:
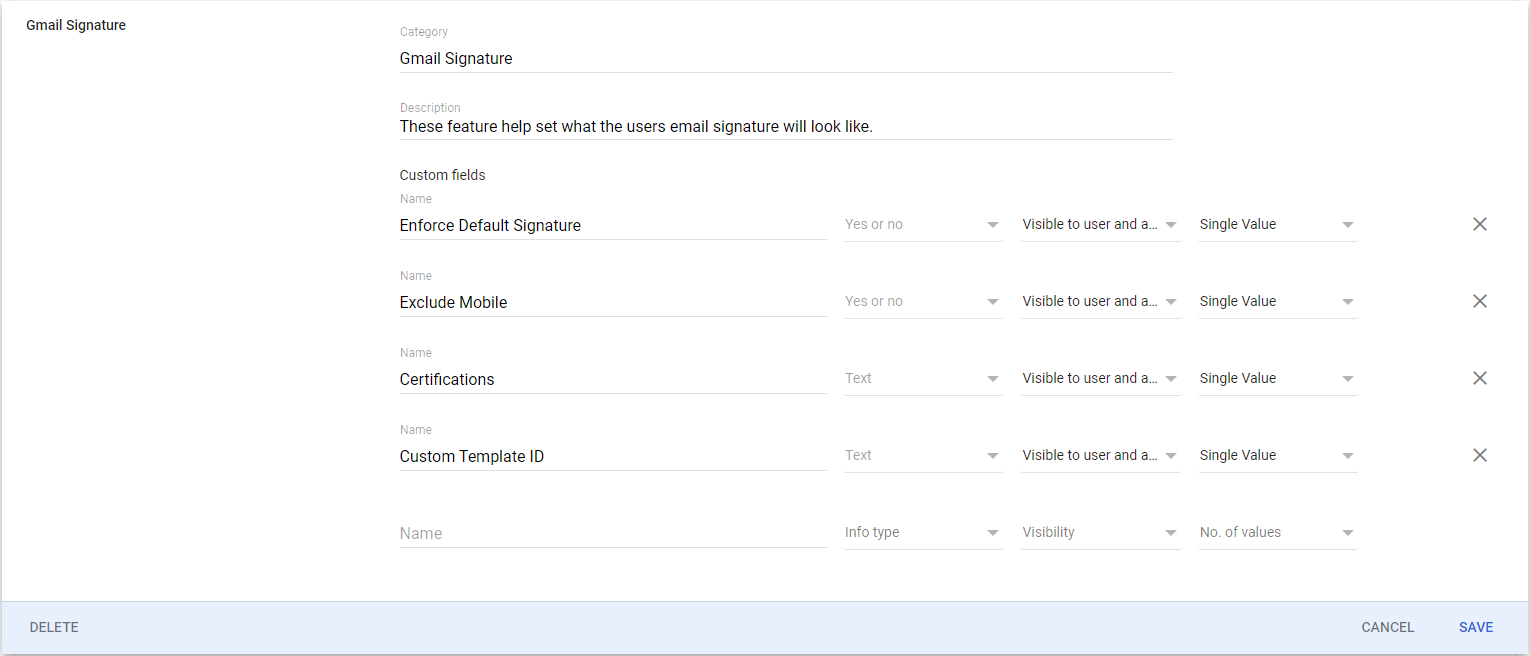
For our organization and our needs I felt these custom attributes would serve us the best. The thought behind these attributes were as follows:
Enforce Default Signature (Yes/No) – If this is set to Yes then the script will include this user in the next template run. Not all users need to have a signature set, also there are special cases where service accounts or role based accounts want to have their own signature not set by the org.
Exclude Mobile (Yes/No) – There are some users that have a company provided mobile device but they do not want to put it in their signature.
Certifications (Text) – Some users that have certain certifications or qualifications that want to have them placed after their name. For example if someone is a Chartered Professional Accountant they want to have CPA show up after their name.
Custom Template ID (Text) – There are some users that need to have a signature automatically applied but don’t follow the default template. This field allows you to enter a Google Drive File ID of the template that you want to use for this user instead. Make sure the user running the Google Active Script has view permissions on the file or the folder it’s in.
You can add more features or less and the coding is fairly simple to include any logic later to deal with these custom attributes. For now I would suggest setting this Enforce Default Signature setting on a dummy test account or yourself for testing till you 100% know it works.
Signature Templates
For our use I decided to create a Google Shared Drive and have all the template files and config inside that Shared Drive and gave my script user access to view this folder as I use the DriveApp to access these files. I did this so I could allow other users with access to change or modify the config to use another template file without the need for an admin to do it. For example we normally have 4 or 5 campaigns running at a time in our Org and we switch the signature once a week to the next campaign. A basic user could just update the config file to reference the default template for that week by editing one file. Our signature script runs every hour so within an hour everyone will have the new signature applied to them. In the future I might use the Google Drive REST API to get the file but till then I am going to just use the built in DriveApp. If you want you can store these files in a My Drive folder just ensure the user running the script has View access.
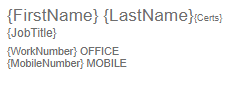
Below is a sample HTML template to apply to all the users
<div style="max-width: 400px; FONT: 8pt Helvetica; color: rgb(110, 110, 110);">
<div><span style="font-size: 13pt;">{FirstName} {LastName}</span><rt> <span style="font-size: 7pt;">{Certs}</span></rt></div>
<rt><div style="font-size: 9pt;">{JobTitle}</div></rt>
<rt><div style="padding-top: 5px;">{WorkNumber} OFFICE</div></rt>
<rt><div>{MobileNumber} MOBILE</div></rt>
The signature will look like this:
If you have done any HTML in the past you might notice some HTML that you have never seen before! I have used <rt></rt> to stand for remove tag. The reason we need these tags is so we can apply some logic to our template. In a perfect world every single users would have a value to fill in every one of these {Tags} in the template. Well as you know we don’t live in a perfect world so we have to anticipate the possibility that a user might not have a Mobile number or a Certification to place after their name.
Let’s look at an example:
If we have a user that does not have a Mobile Number, and we ran their data through the signature script, their signature would look like this
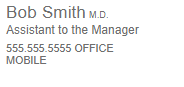
As you can see the {MobileNumber} tag was replaced with nothing because the user did not have a Mobile Number, but the rest of the HTML is still there that has to do with the Mobile Number. So I had to create some logic in my script to account for this and use some HTML elements (<rt></rt>) to help with the removal of unwanted HTML when a {Tag} has no value
The logic is basically this
- if there is a {Tag} that is NOT contained inside of <rt></rt> elements, replace the {Tag} with the value, blank or not.
- If the {Tag} IS contained inside of <rt></rt> elements, AND the {Tag} has a value, replace the {Tag} with tis value and remove the <rt></rt> HTML elements.
- If the {Tag} IS contained inside of <rt></rt> elements, AND the {Tag} does not have a value then remove the <rt></rt> elements and everything in between the elements.
Hopefully this explains why I have created the HTML template as such. I could have used other special characters like [ ] to enclose these lines but when previewing the HTML template it broke the HTML code. The way I choose allows the HTML to display properly so you can preview what a template will look like.
If you have any suggestion or way to do this better I am always up for that discussion.
Configuration File
This file is read in when the app starts and will contain the Google Drive File ID of the Default Template file. If you want to change the default template to another file then replace the Google Drive File ID in here with the new Google Drive File ID. You don’t have to do this and you could just set this value at the beginning of the script, but by doing it this way it allows non admin users to change the default template.
Create a file called config.txt and put the following in it, make sure you replace {Your Google Drive File ID} with the Google Drive File ID of the default template you created in Google Drive above.
config.txt
{"emailTemplateID": "{Your Google Drive File ID}"}
Google Cloud Project
We need to impersonate users so that we can set their signature so we need to use a service account that has the permission to do so. To do this you will need to set up a new Google Cloud Project. Call it something descriptive so you knw what it is for in the future. Once the new project has been created, switch to it.
Create a service account

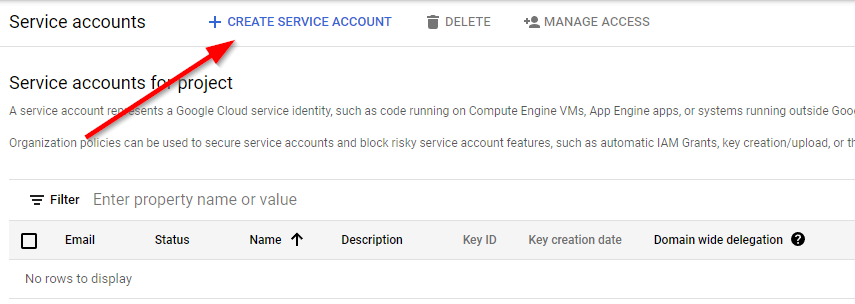
Name your service account something descriptive so you know what it is. Give it a description if you want.
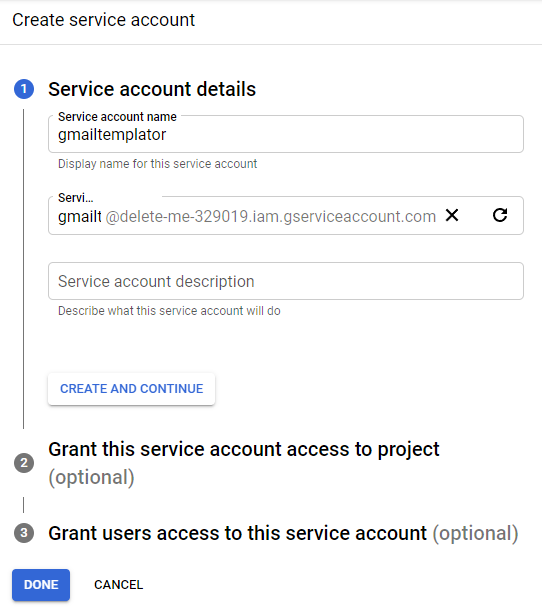
Leave the Grant this service account access to project page as is and same with the Grant users access to this service account and click done.
You will be returned to the service account page and you should see the service account you just created. Click on it

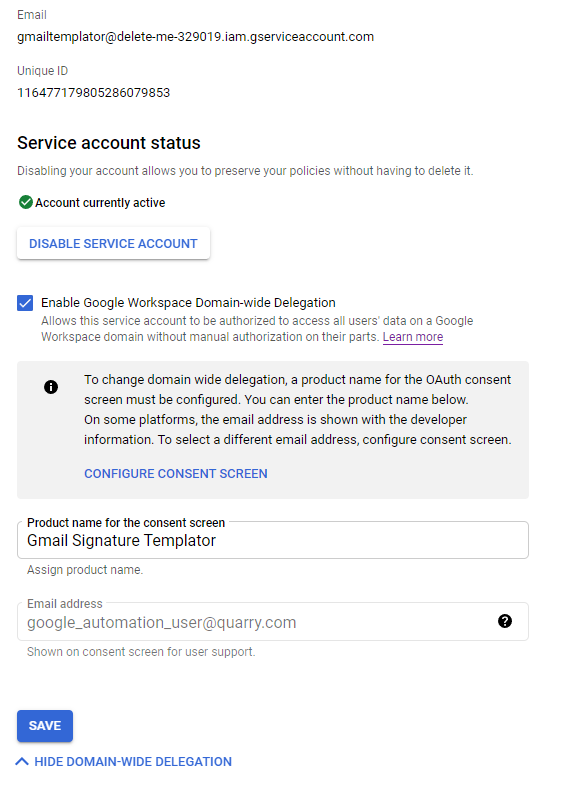
We need to enable Domain Wide Delegation on the account and you will have to give it a name for the Oath consent screen. Click Save.
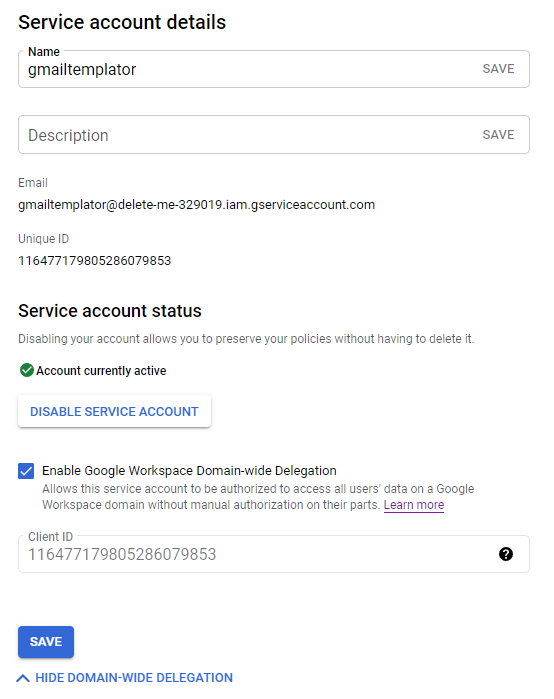
If you click on the service account again and you open the Domain Wide Delegation again you will now see there is a Client ID available to you. Please note this Client ID as you will need it in a few steps. You can always come back later to this page to get it.
You will now need to go to your Google Admin API page and allow this Client ID to have access to certain API scopes for your domain. The point of this is to restrict this service account to only be able to do certain things. Why, because you just gave the service account domain wide delegation capabilities. This does not mean they have domain wide delegation rights yet, it just means if given, they have these rights. When you give them access to your Google Org data you are only going to give them the privilege’s the service needs to do it’s job and nothing more. Please remember that Google Cloud and Google Workspace are two different products and don’t have anything to do with the other. So you have to create the connection between the service account and your Google Ord data using this domain wide delegation option.
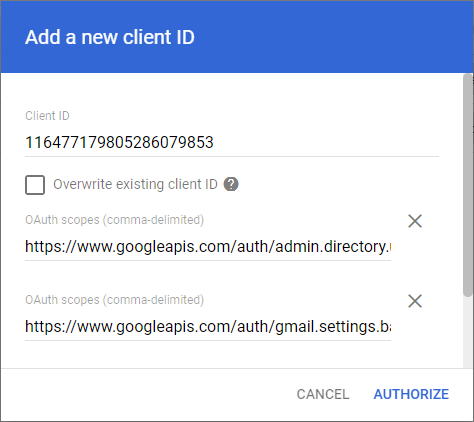
Add a new client and paste the client ID that you obtained in the last step here. the Oauth scopes that we will need for this project are:
https://www.googleapis.com/auth/admin.directory.user.readonly
This allows us to connect to the directory API and get a list of domain users, we only need read only access
https://www.googleapis.com/auth/gmail.settings.basic
This allows the script access to the Gmail basic API to allow the setting of signatures
Click Authorize
You should see the name you gave your Service Account on the Oauth screen you set previously here. This is why we name things descriptively so that later (2 years form now) when you see this you know why it’s there!

What you have just done is created a service account and given the service account permission to access your Google Workspace Data using use the ‘Gmail Basic’ and ‘Directory Read Only’ APIs. We still need to create credentials for this service account but we will do that in a bit. All the ground work is now complete we can FINALLY get onto the code!
THE CODE FINALLY
My Code is stored in a GitHub repository, please check here for the latest code update and changes
Start up a new Google App Script project and call it something descriptive like “Gmail Signature Templator”. You will need to create the following files in the IDE:
- main.gs (Script) – GitHub – This is the main code
- serviceAccount.gs (Script) – GitHub – This connects and creates a service object for accessing Google APIs
- getUsers.gs (Script) – GitHub – This gets the users from the Directory API
- setSignature.gs (Script) – GitHub – This set the signature using the Gmail API
- helperFunctions.gs (Script) – GitHub – Small functions used to parse and sort data
- serviceAccount.json.html (HTML) – Create this file and delete all the default content and leave it empty
Libraries
OAuth2 – 1B7FSrk5Zi6L1rSxxTDgDEUsPzlukDsi4KGuTMorsTQHhGBzBkMun4iDF – Add this Library ID to your project
OAuth2 GitHub page – https://github.com/googleworkspace/apps-script-oauth2
Customizing The Code For You
main.gs
Change the following:
- Line #20 The name of the domain you want to search through
- Line #21 A REAL super admin email address as the Admin SDK Directory API can only be accessed by super admins
- Line #22 The File ID of the config.txt file you created earlier
const searchDomain = '{Domain}';
const adminEmail   = '{Super Admin Email}';
const configFileID = '{Config File ID}';
serviceAccount.json.html
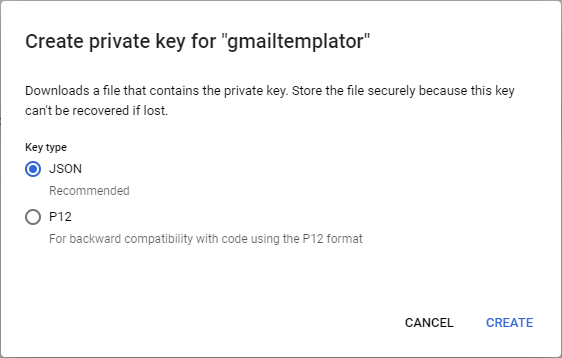
This file will contain the service account key file. To get this key we will need to generate a key for the service account we created earlier. Once you generate the key it will download a JSON file to your computer. Copy the contents of this JSON file into this file.
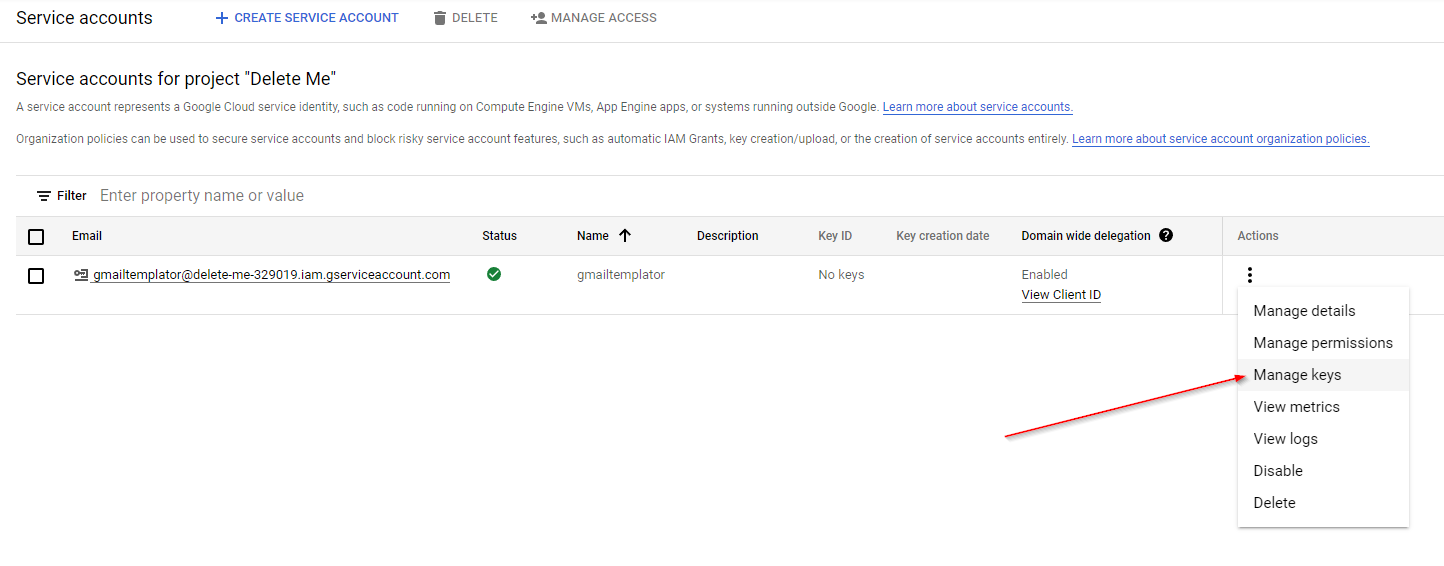
Go to your service account you created and click the 3 dots and click ‘Manage Keys’
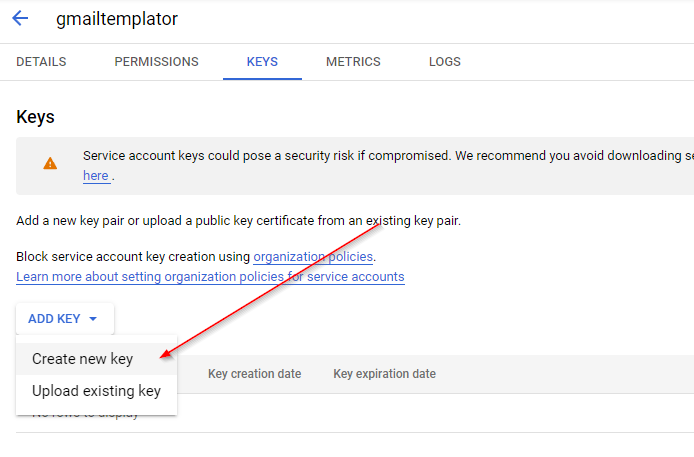
We are going to create a new key
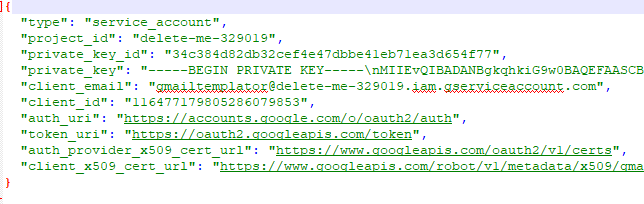
This JSON file is the user name password to your service account so please guard this file and store it in a safe place. I recommend that once you have the files contents copied into the app you can securely delete it from your machine as you will not need it again. If for some reason you ever loose this key you can just delete it from the service account and generate a new one.
The file contents should look like this (dummy data, this is not a real service account key)
Testing The Script
The first time you run the script it should ask for access to Google Drive (to get the config file, the signature template, any any other custom templates). It will also ask for external access (the app uses UrlFetch to connect to the Google APIs). I would recommend that you do your signature testing with a dummy account and check that each settings works as expected before applying it to more users. Once you are happy and it’s working fine you can start to apply it to a few other users.
Known Issues
Please remember I am just a IT guy that programs and I have only coded for our environment (~100 users). I have no idea how this code will do at large scale. I would love to know how many users you are using it for and the average time it takes to run the script for you. I might have to add a feature that processes 50 users at a time then call the script again to ensure it can finish as there is a 360 second limit to Google App Scripts.
I have made the script verbose so that you can see it working as it runs. After you are sure it is running you can remove the noisy Logger.log() calls but I recommend leaving them in so if there is an issue you can see the logs of the last run. Currently I am applying the signature to 100 users and it takes about 80 seconds to 160 seconds to complete.
Automate the Script
I have created a timed based trigger that executes the start() function every 1 hour to ensure the signature is constantly applied to the user. Other cool ideas would be the ability to trigger the script using a bot Direct Message or a webApp that you can hit using a URL. the ideas are endless
Feedback
This is my first attempt at writing such a complex script and sharing it to the world. I am open to constructive criticism and notes about things I have botched. Please I would love to get your feedback even if it’s just a pat on the back to say “Thanks I needed this script and it works for me”.