
Backgroud Story (bla bla bla)
So I have taken a head long dive into FreeNAS, and I am loving it! I was able to use some old hardware to do all the things I needed for my home network. Services like Frigate as my NVR (see you later licenses), HomeAssistant for Home Automation, Emby for our Media and Entertainment and Transmission for a BitTorrent Client. After building the system (and finally leaving it alone) TrueNAS has been stable and besides a decent learning curve has been fun to use and explore.
Becuase I was just playing around with TrueNAS at first, I was only using random hardware I had laying around… 1TB NVMe drive a bunch of 2TB consumer Barracuda Segate drives (Yes Mr. Elitist I know! I already read all the forum posts about NOT using SMR drives, put the keyboard away it was jsut for testing). After I saw that the system was stable and had tonns of RAM and CPU for what I needed it for I decided to update and harden the system with better hardware. I decided to do an inplace upgrade insted of a bare metal re-instal just as a learning experience, besides anyone can insatll on bare metal, I find you learn more if trying to not break somthing at the same time!
I decided to upgrade the 2TB consumer SMR drives to Enterprise SAS CMR drives. This required a PCIe SAS controller (I have a comsumer motherboard) but it was simple to find and install a SAS PCIe controller and TrueNAS picked up my LSI 9201-8i RAID Controller Card right away with no drivers or issues. Note if you get this controller make sure it’s flashed with firmware for IT mode AKA non RAID mode. You want the raw disks to be exposed to TrueNAS not an already built RAID. The controller was a very good value at $100 CDN on Amazon. I replaced 1 drive at a time in my pool (I only have 3) and it took about a day to do this but it was a very easy task!
After my VDEV was nice and healthy, I decided to next look at my boot-pool for a few reason:
- My consumer motherboard only has one NVMe slot. I really wanted to use the slot for playing around with a Coral NVMe TPU for Frigate and object detection.
- 1TB was overkill for a boot drive as you really only need a 32GB drive, the rest of the space goes unused!
- There was only one drive for the boot-pool (no redundancy)
I had two SATA SSDs that were 240 GB so the first issue was that my replacement drives were smaller than my current boot drive. If they were the same sizr it could have been as easy as just replacing one disk with another one and then adding a mirror.. But alas, I was shrinking the drive size and as of this article this is not possible with ZFS (But you can grow it if you replace all the drives with larger ones). So this meant doing it the hard way, or so I thought becuase TrueNAS made it easy.
Meat & Potatoes
A few things you’ll need:
- A USB Installer that is the EXACT same version (even the little nubmers) as your currently installed TureNAS OS. Please note, this is what I was told on Discord support so I did not argue the answer. I anyone else knows a more exact requirement like only the major version has to be the same but minor version can be differnet, please feel free to share.
- A Backup of your current TrueNAS config. Make sure you select to export your secret seed (if you don’t select this you will have to set passowords agian for all your accounts). Store this on a machine that is NOT connected to your NAS as your NAS will not be available until after you restore this config, Don’t lock your proverbial keys in the car!!! Also keep this file safe as it has your secreate seeds
- No backup is needed of any of your installed apps or VMs as all this information is all stored on your VDEV pool. BUT….. it is always a good idea to have backups of your data incase anything goes wrong!
Please note I only had 3 Applications installed that were iX Applications and HomeAssistantOS as a virtual machine. Your milage may vary based on what you have running or if you ahve done any crazy modifications to your NAS. This is just my journey!
I created an installer on a thumb drive that had the EXACT same version as my OS (23.10.10.1 as of the writing of this article). At this point I also made a decision going forward that as a standard plan, any time I update my OS, I will also I reimage my thumb drive to the same version on it so you always have an installer that is the same version as your hardware for emergencies. I do this becuase if it crashed do you know the exact version you were on? Maybe it’s in your config backup.. maybe its not.. It’s just a good idea!
I accessed the Web GUI and downloaded a backup of my config and checked the box off to export my secreat seed. I saved the backup to my laptop desktop.
I did a clean shutdown of TrueNAS (IE I did not just pull the power!) and removed my NVMe drive and set it to the side for backup (incase this didnt work)
I installed both my SSDs and booted in to my BIOS. It is important to note that in my case I have removed the NVMe and are now installing two new SSDs that A) you want to make sure the BIOS can see therefore TrueNAS can see and B) you want the BIOS set to now have one of these SSDs to be the primary boot device (after USB) and the second to be the secondary boot device. If you do not do this you might install the OS properly to the new drives but it will never boot becuase you diid not tell the BIOS to boot from these SSDs and it might continue to look for the removed NVMe. Just make sure it’s right before installing TrueNAS.
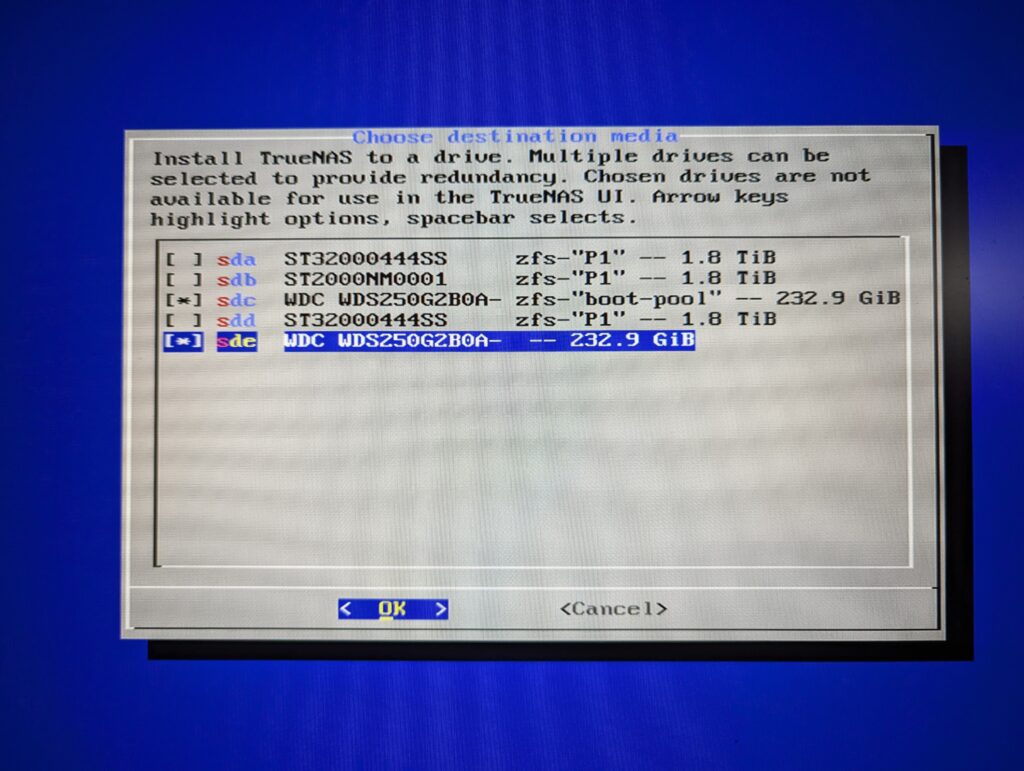
Once everything looks good in BIOS, reboot with the thumb drive installed and you should be greated with an install menu. The install is fairly simple but when it comes to selecting your drives to install TrueNAS to it might get confusing. I currently have 3 SAS drives in a pool called P1. As you can see by this screenshot below TrueNAS does an amazing job of telling you what drive is what. My SAS drives are labeled as zfs-“P1” which tells me these disks are members of a ZFS pool called P1. This make it very simple to see your new drives. I had already done some playing around with one of the SSDs so this is why one of my new drives already had a zfs-“boot-pool” label. But if you look at highlighted drive in the screen shot (sde) this is what most new drives will look like and will have no label at all on them. I also highly recomend that you keep a list of what drives and serial nubmers you have installed so you know 100% what drive is for what! I even sharpie my disks with a unique ID and then put those IDs in the description field in TrueNAS so you know for sure when replacing a drive what drive it actually is in the physical system!
I selected sdc & sde to create a mirrored boot-pool
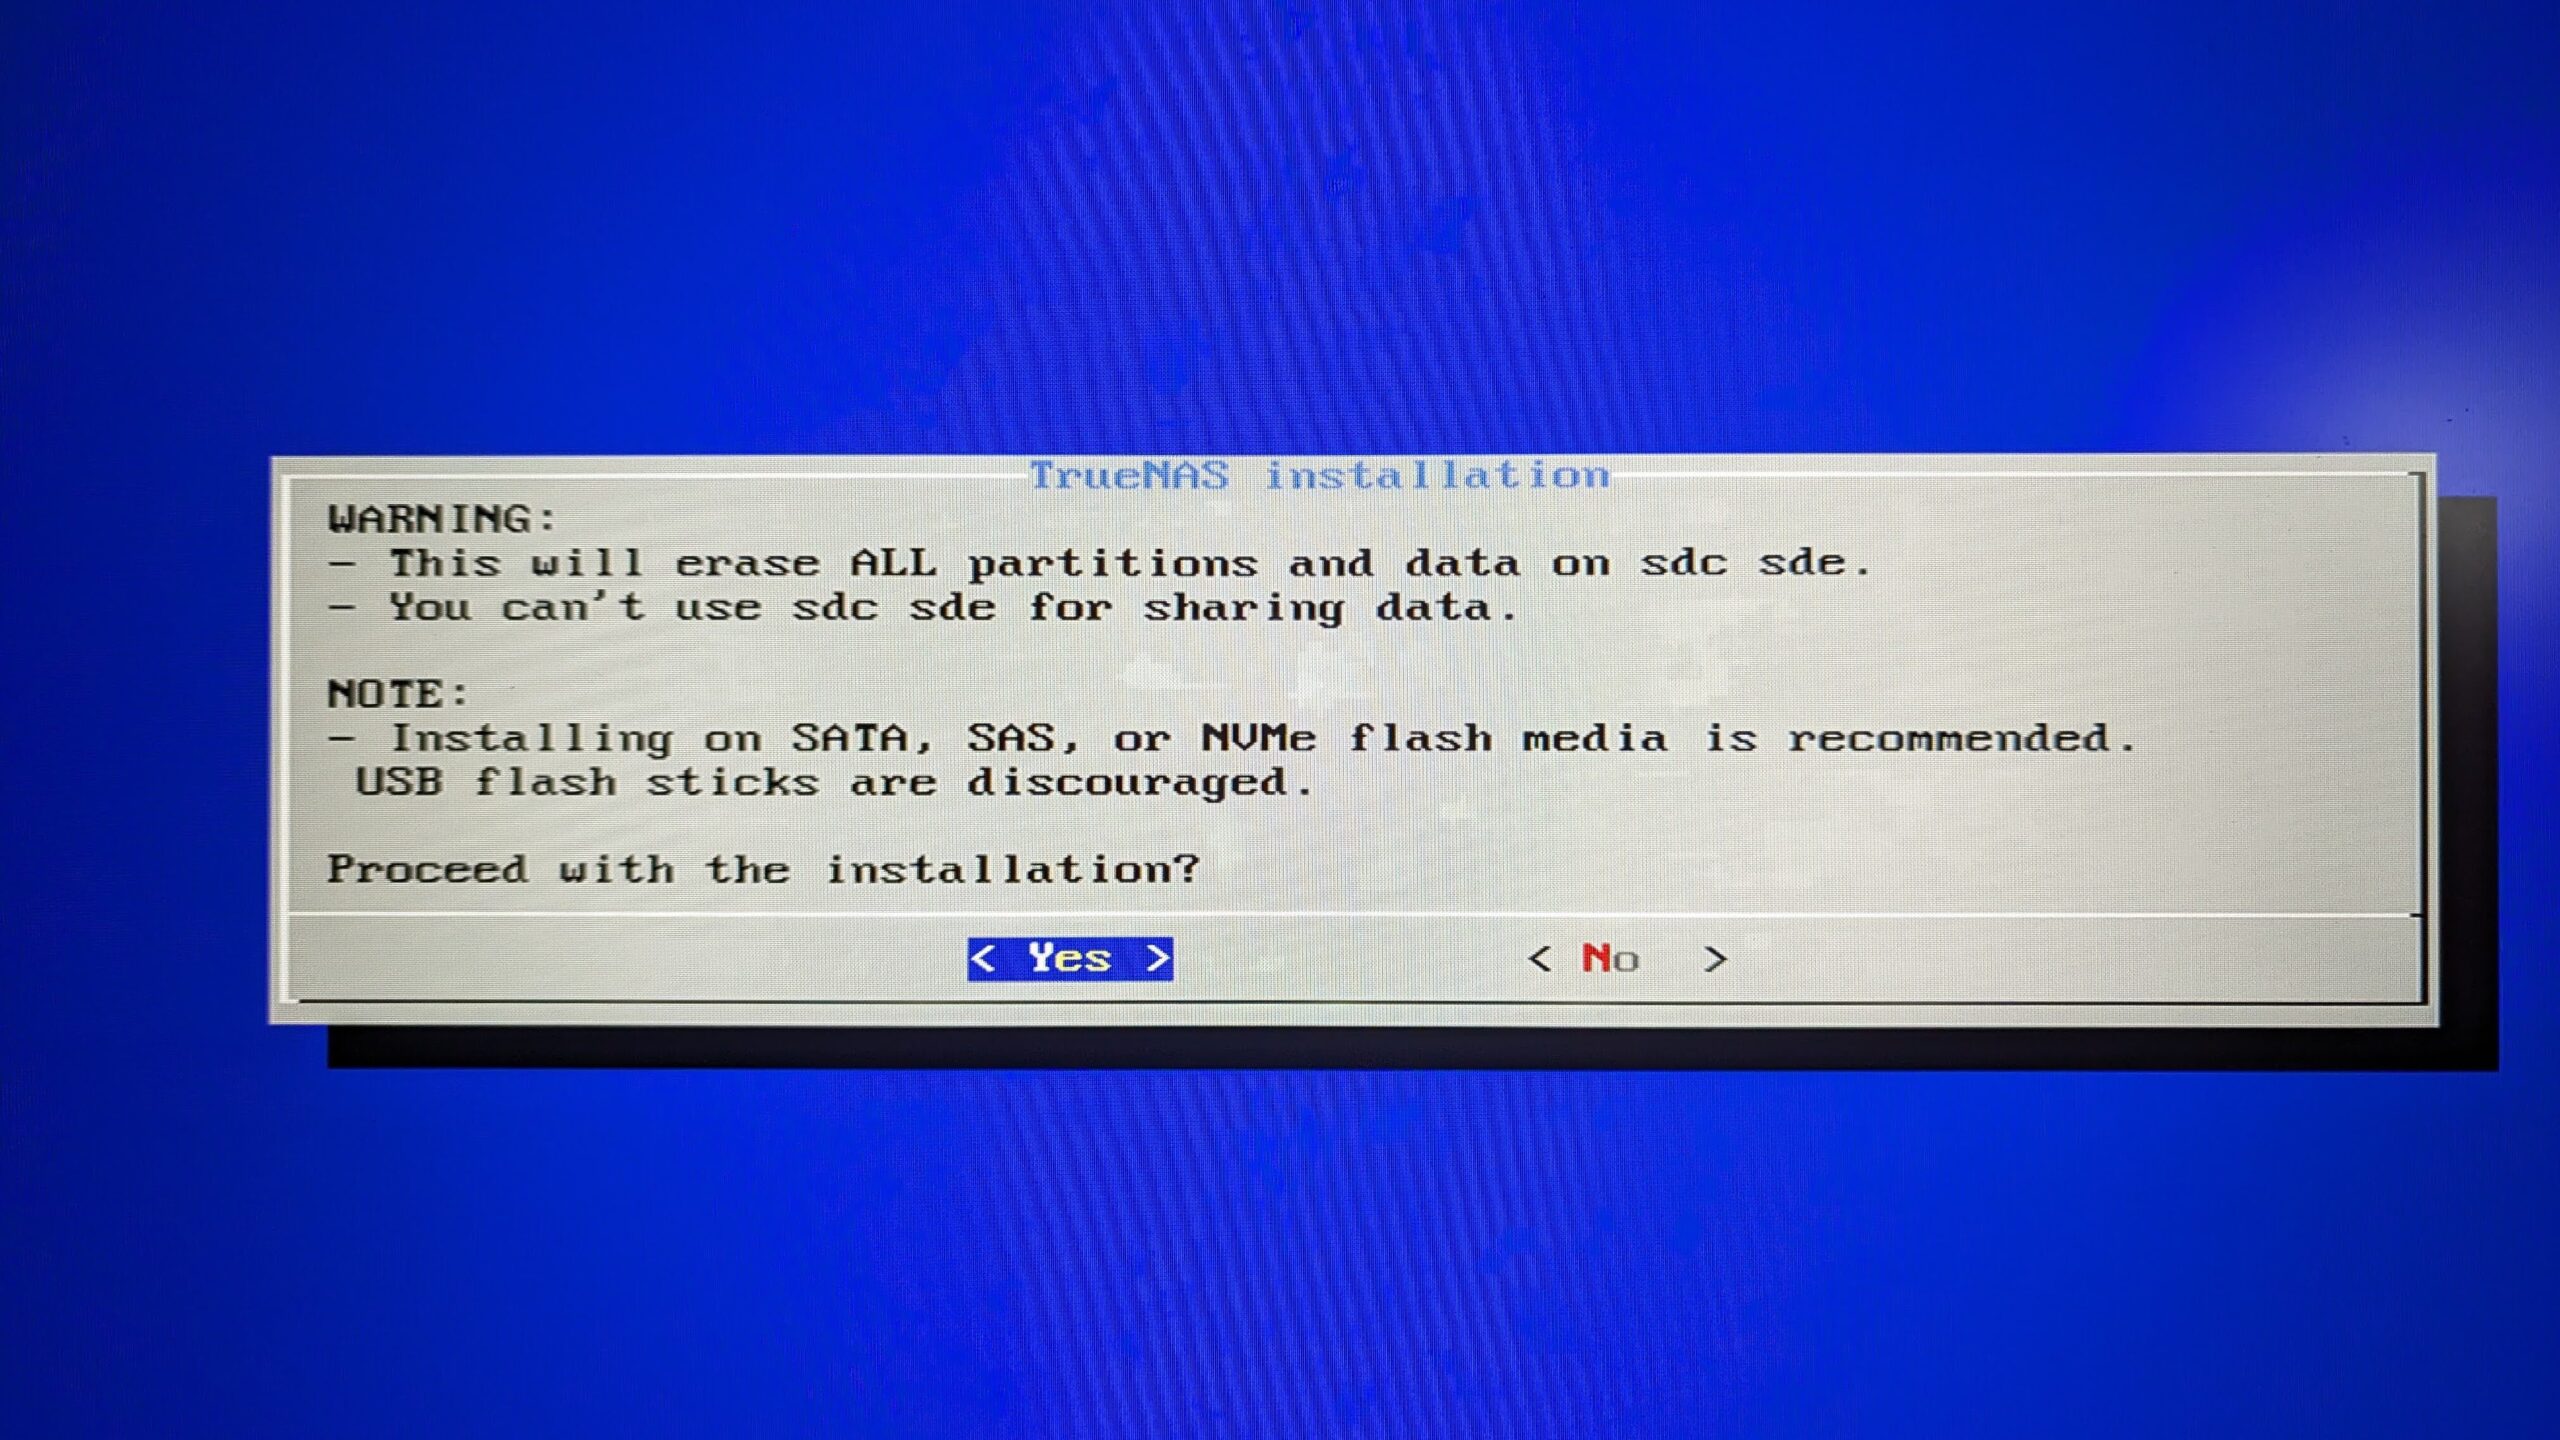
TrueNAS will let you know all data on it will be destroyed and also recoments that you should be using SATA or SAS or NVMe for your boot drive.. You’re not using a thumbdrive to boot form are you hehe…
When asekd about the Admin username and password during the intall, just set it to the same user name and passowrd as before, even though after you restore the config it will be returned to the same it just makes life easier.
Afer the installer is finished you can access TrueNAS using the Web UI using the admin username and and password set during the instl. Go to the system page and upload your backup configuration. After uploading the system will reboot. Access the restored system using the old admin username and password (remember you restored all your usernames and passowrds with the config restore… this is why it’s easier to just make your admin passowrd the same so you don’t have to remember anything extra).
You will also need to go to your apps page and go to the configuration to set what network adapater and gateway to use for your apps!
Thats it. Your VDEVs and datasets should have been reimported automatically.
I could not believe how easy this was to create a new mirrored boot-pool. I was so afraid of somthing going wrong or it being more complicated then it really was. Shout out to the TrueNAS team!!